CACHE MANAGEMENT IN OBIEE PLATFORM
CACHE MANAGEMENT : -
- Cache is a Physical Memory which stores in Hard-Disk. We Have allocated a some disk space in NQSConfig file. where it stores the recent executed data.
- When we run the report in OBIEE for first time, it will get cached if the cache is enabled. Then when we run the report for next time, the report will be coming from the cache, and physical query for the report won’t be generated. If any change happened to data in underlying database after the first report run, the changes won’t get reflected in the report as the report is coming from cache.
- We could enable / disable the cache at an application level, table level or at the report level.
ADVANTAGES OF CACHE :-
- Eliminates unnecessary database
processing because pre computed results are stored in a local cache.
- Improves query performance by
fulfilling a query from the cache as opposed to searching through the
database.
- Conserves network resources by
avoiding a connection to the database server.
- Accuracy –
Flush any data from the cache that is now stale
- Speed –
Prime the cache so that as many queries get a hit on it, first time.
DIS-ADVANTAGES OF CACHE:-
1. Disk Space: -
1. Query Cache requires dedicated disk space.
2. Administrative Tasks:-
1. Set the cache persistence time approximately.
2. Purge the cache when necessary.
3. Keeping cache up-to date:-
1. Stale Data.
2. Evaluate what level of non-current
information acceptable.
CACHE ARCHITECTURE :-

Image-1 Cache Architecture
Explanation :- Whenever User requested It will directly go to Cache Metadata, if cache hit status=YES then it will take from cache then give it query cache and sends to User. I can say this process plan is very fast in this case. And if cache hit status=NO then that User request is creates Logical SQL and BI SERVER converts Logical SQL to Physical SQL then that Physical SQL will be given to server database. Finally it checks and give it back to BI SERVER then sends to USER.
Note: At this point of time cache will be created. when again if User ran a same it it will pick from Cache itself.
Flow of Query executing :-

Image-2 Query-Flow
Cache Management :-
There are 3
ways that we can implement to enable/disable cache.
- Enable/Disable cache at
Application level.
- Enable/Disable Query Cache at
Table level
- Enable/Disable query cache at
Report level
- Enable/Disable cache at Application level.
Application Level:-
1. To change the cache
setting at application level, follow the below mentioned steps.
2. Navigate to
enterprise manager
1. To change the cache
setting at application level, follow the below mentioned steps.

Image-3 Cache Parameter

Image-4 Cache manage
Here You can Observer in Image-3 when your Enable cache in Enterprise Manager its Automatically changes in NQSConfig File to "YES". There is one more understanding at this moment when cache is Enable in RPD cache manager can appear and we can see cache's created over there in Image-4.
As a same way look at Image-5 and Image-6. when cache is Disabled at EM then Automatically it cahnges to "NO" in NQSConfig File. and also You can observe there in Image-6 that when cache is Disabled then in RPD in Manage Cache option will be grayed out

Image-5 Cache Parameter

Image-6 Cache Manage
Below paths which is in Path-1 is place where creating all cache files when you ran a reports in Analytic Answers and whereas path-2 is like have a cache parameters which had been created during installation time by default.
Path-1:-
C:\OBIEE11g\instances\instance1\bifoundation\OracleBIServerComponent\coreapplication_obis1\cache
Path-2:-
C:\OBIEE11g\instances\instance1\config\OracleBIServerComponent\coreapplication_obis1\NQSConfig
2. Enable/Disable Query Cache at Table level
Table Level:-
- We
could manage cache settings at table level using OBIEE Admin Tool.
- Navigate
to the Physical layer of RPD and select the table for which the cache
settings need to be changed.
- Make
changes in the RPD and deploy it.
- Once
the new RPD is deployed, restart the OBIEE Services.
When Cache is Enable at Table level:-

Image-7 Physical Table

Image-8 SQL Logical request
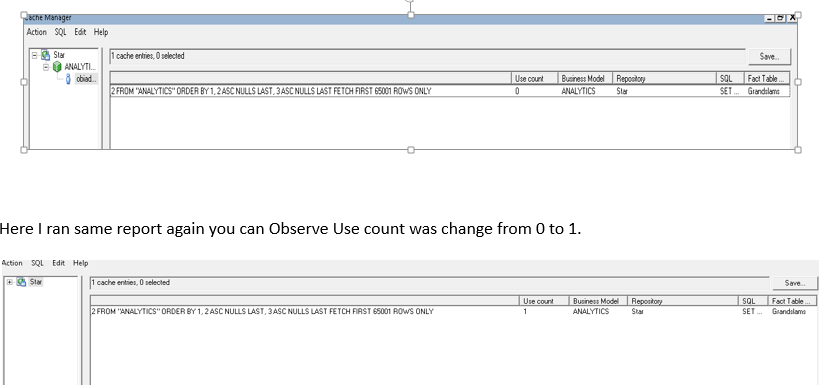
Image-9 Cache Manage Tab
When Cache is Disable at Table level:-

Image-10 Physical Table

Image-11 Cache Manage Tab
3.Enable/Disable query cache at Report level
Report Level
- To
disable cache at the report level, follow the mentioned steps
- Navigate
to the Advanced tab in Analysis
- To
disable Oracle BI Presentation Services Cache, select option shown below.
- To
disable cache at the BI Server Level, type in below mentioned command on
the Prefix section
SET VARIABLE DISABLE_CACHE_HIT = 1; - Click
on Apply (Not Apply SQL. If you click on apply SQL, it will throw error)

Image-12 Advance Tab Report level
Cache Management:-

Image-13 Cache Management
Purging:- Cleaning cache is called a purging.
Different ways we can purge the cache.
- Manually
- Persistence
Time
- Event
Pooling Table(EPT)
- ODBC
Functions

Image-14 Cache Manage to Purge
2. Persistence Time:-
- Set cache persistence time to indicate how long entries for this table should be kept in the cache.

• Here
you can absorb that cache is created as we kept 1 minute time of persistence
time so that it will be purge automatically after 1 minute.
• In
2nd screenshot you can see that purging is done.

Image-16 Cache Manager Tab
3.Event Pooling table(EPT)
•
OBIEE 10G/11G-Event Polling table(Event
Table) to purge the cache automatically after ETL process took place.
•
The use of an Oracle BI Server event polling
table (event table) is a way to notify the Oracle BI Server that one or more
physical tables have been updated and then that the query cache entries are
stale.
•
Will create table called (S_NQ_EPT) is a way
to notify the Oracle BI Server that one or more physical tables have been
updated.
•
Finally it truncate the Event
Table(S_NQ_EPT).

Image-17 EPT Diagram

Image-18 EPT Schema & DB Properties

Image-19 Enable EPT in RPD
Now
event table is configured in the Oracle BI repository and cache
invalidation occurs automatically. As long as the scripts that update the event
table are accurately recording changes to the tables, stale cache entries are
purged automatically at the specified polling intervals(1mins in our example).

Testing:-

Image-21 Purge Table
You can Observe in Image-21 that 1st screen shot have a 1 record in table after 1 minute it had purge the cache as per our given time at EPT in RPD in screenshot 2.
4. ODBC Through Purge Cache:-
• Create
new database in physical layer of RPD.
• Name
Database Test_Cache and check Allow Direct database request by default.

Image-22 RPD Database Properties
• In
below image use can see DSN of present RPD Name.

Image-23 DSN Adding
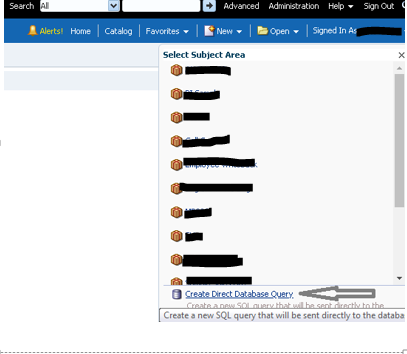
• Create
new analysis. Without selecting any subject area, select "Create Direct
Database Request" as shown in below Image-24
- Save analysis as Cache purge report and schedule that report to purge the cache automatically.

Image-25 Purge at report
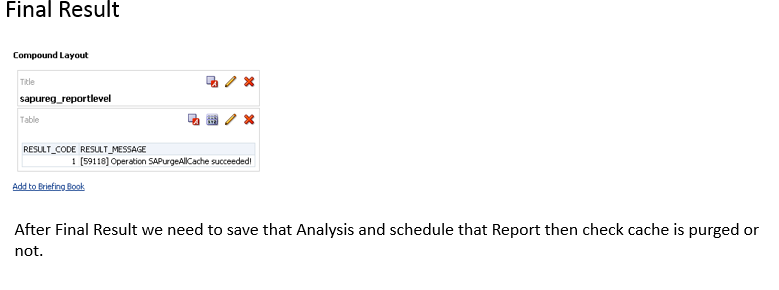
Image-26 Result
SEEDING CACHE:-
1. Scheduling report to Create CACHE
2. And we can create cache by manually by running a normal report.

Image-27 Catalog folder

Image-28 General Tab

Image-29 Schedule Tab

Image-30 Condition Tab

Image-31 Recipients Tab

Image-32 Save Tab
At Finally after scheduling report it will run the report and it will create a cache.
Conclusion:- In this Blog I have explained about purpose of cache management, Purging techniques and purpose of Cache Seeding.
Conclusion:- In this Blog I have explained about purpose of cache management, Purging techniques and purpose of Cache Seeding.
Comments
Post a Comment